How to Use a Nespresso Milk Frother
Here's how to use a Nespresso milk frother: fit the whisk, add milk to the correct fill mark, close the lid, and start your chosen cycle. Aeroccino3 makes hot or cold milk froth; check your model's manual for its controls.
On this page (9 sections)
- How do you use a Nespresso milk frother step by step?
- How much milk should you add?
- How do you make hot or cold milk froth?
- Which milk gives useful foam for lattes and cappuccinos?
- How do you pour milk for a latte or cappuccino?
- Which Nespresso machine and frother bundle suits you?
- How do you clean an Aeroccino after each drink?
- What mistakes cause weak foam or spills?
- How to use a Nespresso milk frother in your daily routine
Here's how to use a Nespresso milk frother: fit the whisk, add milk to the correct fill mark, close the lid, and start your chosen cycle. Wait for it to finish, then pour the milk into your coffee.
Aeroccino3 makes hot or cold milk froth, but controls and attachments can differ across Aeroccino models. The habits that matter most are leaving room for foam, starting with a clean whisk, and washing away milk residue after each use.
How do you use a Nespresso milk frother step by step?
Start with a clean jug, the correct whisk, and milk below the right fill limit. Keep the electrical base and underside connector dry before placing the jug on its base.
- Put the base on a dry, level counter with room to lift and pour the jug.
- Fit the whisk or attachment shown in your model's manual.
- Add fresh refrigerated milk, using the fill mark for your chosen preparation.
- Fit the lid securely.
- Select the hot or cold cycle using your model's controls.
- Let the cycle finish before lifting the jug or removing the lid.
- Pour into your coffee, then clean the frother once it has cooled.
Before first use, wash the removable parts as directed and dry them. Put milk only in the frother; the coffee machine's reservoir is for water.
How do you choose the whisk in a Nespresso milk frother?
Choose the attachment setup for foam or heated milk, following your model's diagram. Don't copy a whisk arrangement from a different Aeroccino.
A foaming spring helps introduce air, while a stirring setup serves a different purpose. Only remove or change parts that your manual identifies, and check that the whisk sits properly before starting.
For the coffee side of your routine, follow our guide to how to use a Nespresso machine. Have your cup and capsule ready so the finished milk doesn't sit while you prepare everything else.
How much milk should you add?
Use the fill mark for the cycle, rather than filling the jug to its rim. Frothing needs spare space because the milk expands as air enters it.
If your jug has separate limits for foaming and heating, use the lower foaming limit when making foam. Follow any minimum amount in the manual so the whisk can work properly.
The coffee machine's water-tank size tells you nothing about the frother's milk capacity. Measure inside the milk jug, and don't estimate its limit from the size of your mug.
For several drinks, plan separate batches within the marked limits. Overfilling to save a cycle can cause spills and leave milk around parts that should stay dry.
How do you make hot or cold milk froth?
Choose hot froth for a warm drink and cold froth for an iced drink. Aeroccino3 supports both, so you don't need a different frother just to switch between them.
For hot drinks, brew your espresso close to the end of the milk cycle and pour promptly. A cold, heavy mug can take heat from the finished drink, so warming the cup with hot water first can help.
For iced drinks, prepare the coffee and ice with enough room for milk and foam. Cold froth avoids adding heated milk, though warm coffee will still melt some ice.
Use the button action in your exact model's manual. Don't assume every Nespresso frother starts its cold cycle in the same way.
Which milk gives useful foam for lattes and cappuccinos?
Start with fresh refrigerated milk, then adjust your choice based on the texture you prefer. Milk protein, fat, and added ingredients affect how much foam forms and how long it holds.
Dairy milk can produce different results depending on its fat content. Plant drinks vary widely; a barista version is a sensible choice when your usual alternative separates or makes thin foam.
Change one thing at a time: keep the amount and cycle steady while comparing milks. That helps you identify a milk problem without repeatedly changing the whisk setup.
Nespresso says the Aeroccino3 in the Breville bundle froths all types of milk, but that doesn't mean every milk produces the same texture. Choose milk for both its taste in coffee and its foam.
Unless your manual allows it, add syrups, powders, and other flavorings to the cup rather than the frother. This keeps sticky ingredients away from the whisk and heated surface.
How do you pour milk for a latte or cappuccino?
Pour soon after frothing, while the milk and foam are easier to combine. Use a cup large enough for the coffee, milk, and foam together.
For a latte, pour steadily into the espresso and add foam to taste. For a cappuccino-style drink, hold back some foam with a spoon while pouring the milk, then spoon foam over the top.
An automatic frother's foam can be thicker than milk prepared with a steam wand, so focus on the drink's balance before trying detailed latte art. Our guide to making a latte with a Nespresso machine covers the drink method.
Which Nespresso machine and frother bundle suits you?
Choose the coffee machine for your drinks and counter space, then check the included frother. If you already have a working coffee machine, you can keep it and choose a separate frother.
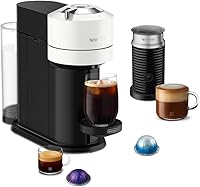
All 4 options below pair a Vertuo machine with a milk frother. These are whole coffee setups, so skip a bundle if you only need to replace the milk jug.
Breville Vertuo bundle: for coffee and espresso drinkers
Choose this bundle if you want coffee and espresso with an Aeroccino3, plus a larger water reservoir than either Pop+ option here. Its 40 oz reservoir suits a routine with several drinks between refills.
The machine uses Vertuo capsules only and has an adjustable cup support. Skip it if you want to keep using Original capsules, and measure room for the separate frother alongside the brewer.
Vertuo Pop+ Deluxe: for small coffee stations
Choose the Pop+ Deluxe if counter space and easy tank access lead your decision. Its compact design includes a removable 25 fl oz water tank at the side.
The brewer supports single and double espresso plus 5, 8, 12, and 18 oz coffees. Skip it if frequent water refills would bother you, especially when you mainly brew larger cups.
Vertuo Next: for narrow counter gaps
Choose the Vertuo Next if you have a narrow but deep space. The brewer measures 5.5 inches wide and 16.9 inches deep, so width alone isn't enough to judge its fit.
It supports single and double espresso alongside 5, 8, 12, and 18 oz coffee sizes. Skip it for a shallow shelf, and leave separate space for the frother and access above the machine.
Vertuo Pop+: for side-access refills
Choose the Pop+ if you want a compact brewer with a side-access water tank and a separate Aeroccino. Its drip tray has 2 positions to accommodate different mugs.
The tank holds 25.4 fl oz, and the brewer measures 14 inches deep by 8.6 inches wide. Skip it if you need a larger reservoir, and confirm the Aeroccino model if specific controls or care requirements matter to you.
Compare complete setups in our guide to Nespresso machines with a milk frother. For a closer look at the brewers, see our best Nespresso Vertuo machines.
How do you clean an Aeroccino after each drink?
Clean the jug and whisk after each use, once heated parts have cooled. Milk residue becomes harder to remove as it dries and can interfere with the next batch.
Disconnect power, remove the permitted parts, and wash them using your model's care instructions. Clean around the whisk fitting and lid seal, where milk can collect.
Use gentle cleaning tools and avoid abrasive pads that could damage the interior. Don't immerse the electrical base, and keep the connector dry.
Dishwasher care varies by model, so check before loading any part. Dry everything as directed before reassembly, and never try to remove milk residue with the coffee machine's descaling solution.
What mistakes cause weak foam or spills?
Check fill level, whisk placement, and cleanliness first. These are useful starting points before changing milk or assuming the frother needs replacing.
- Milk overflows: use the foaming limit rather than a higher heating limit.
- Little foam forms: check the attachment, remove milk residue, and try fresh milk.
- Foam varies between batches: keep milk amount, starting temperature, and cycle consistent.
- The unit stops or won't start: check that the jug is seated and follow the manual's troubleshooting steps.
Disconnect power before inspecting the whisk or cleaning the unit. Don't adjust moving parts or repeatedly restart a frother that behaves unusually.
Our Nespresso milk frother troubleshooting guide covers the next checks. Stop using a damaged unit and contact Nespresso if the manual doesn't resolve the fault.
How to use a Nespresso milk frother in your daily routine
Build your routine around one drink, one measured batch, and prompt cleaning. Once the result suits you, change the milk or foam amount only when you want a different drink.
Keep your current brewer if you only need milk froth. Choose the Breville bundle for its larger reservoir, Pop+ Deluxe for a compact setup with Aeroccino3, Next for a narrow gap, or Pop+ for its side-access tank.
If you're choosing your first coffee setup, start with our Nespresso machine guide. Decide which coffee system suits your drinks before choosing the bundle.
Frequently asked questions
How do I use a Nespresso Aeroccino milk frother?
Fit the correct whisk, add milk within the fill limit for your chosen cycle, close the lid, and start the frother; follow your model's manual for the button action and attachment setup. Wait until the cycle ends before pouring, then clean the jug and whisk once they have cooled.
Do you put milk in the Nespresso frother before or after brewing coffee?
Either order works, but aim to finish the coffee and milk close together so you can pour promptly. Brew espresso into a cup with room for milk and foam; always put milk in the separate frother, never in the coffee machine's water tank.
Can you use cold milk in an Aeroccino?
Yes, fresh refrigerated milk is a useful starting point for frothing. Aeroccino3 offers both hot and cold milk froth, so cold milk does not mean you must choose a cold cycle; select the setting for your drink and use the matching fill limit and whisk setup.
How do you clean a Nespresso milk frother?
Disconnect the frother from power, let heated parts cool, and clean the jug, whisk, and removable lid parts as your manual directs. Use gentle tools rather than abrasive pads, and keep the electrical base and connector dry; check dishwasher guidance for your exact model before putting any parts inside.